An application usually has multiple dialogs, each binding to a different content component. We use them to inform users about specific and crucial information which may require them to perform additional actions or tasks. Most application dialogs are dynamic, and we usually can't afford to add all the dialogs to the main root element as the placeholder. Hence we need a system to manage, render the appropriate content for a single dialog instance during run time, and trigger the open/close and related actions accordingly.
To accomplish that goal, we use state machines and state diagrams.
What is State Machine?
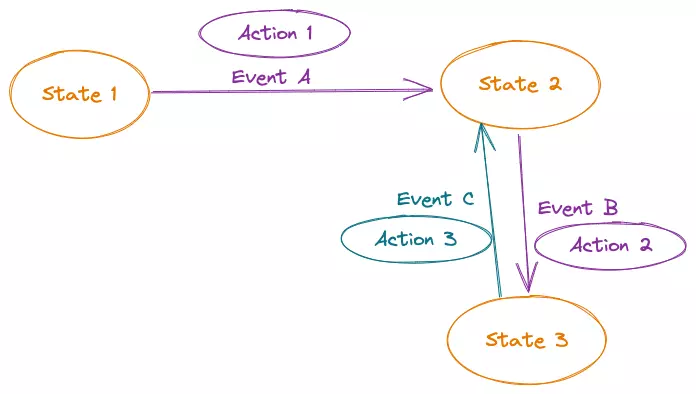
A state machine, or finite state machine, contains a finite amount of states representing the machine's reactions to a series of events at a given time. A state machine can only store a single status at a time and can move from one state to another state based on the given event inputs.
We use state diagrams to demonstrate the flow of a state machine, with each node representing a state and each edge representing the event transition from one state to another. Also, for each event edge, we can execute actions to control the internal data context of the machine upon state changes.
Below is an example of a toggle state machine with two state nodes (on/off), one connected to another using the TOGGLE event.
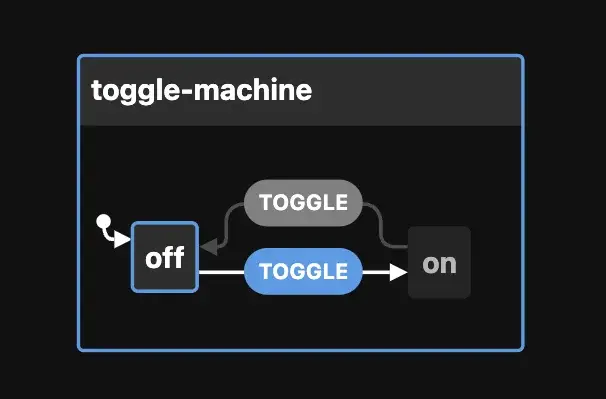
Next, let's define our dialog state diagram flow.
Defining the dialog states diagram flow
The nature of dialog is to be visible and in focus from the moment the user opens it until he dismisses it or completes a required action on the dialog.
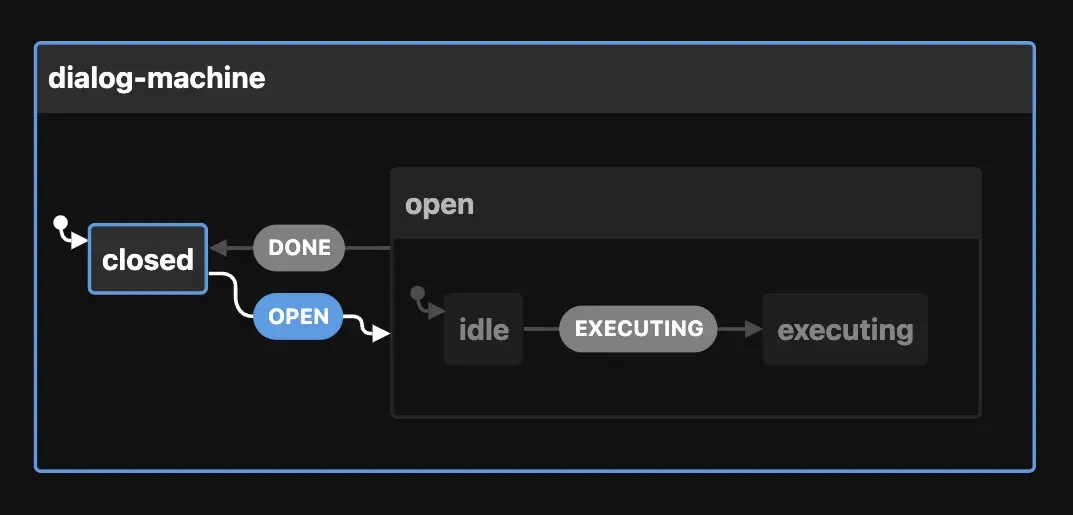
Hence, a dialog machine has two primary states: closed and open. closed represents when the dialog is not visible to the user, and open is otherwise. We move from closed to open using the OPEN event and from open to closed using the DONE event, as shown in the diagram below:
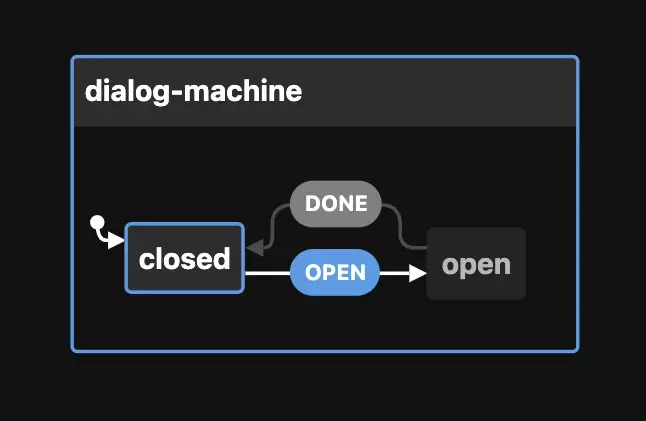
Note that this flow diagram only works for simple dialog, where the user doesn't need to perform any additional action besides opening/closing the dialog.
In the scenario where the user has to perform a confirmation, the dialog will trigger an additional action, usually, a custom action attached to the dialog, before dismissing the dialog. Within its open state, it has to transit internally from being idled (waiting for the user to hit the confirm button) to executing mode (triggering the custom action upon confirmation). After finishing the custom action execution, it moves to the closed state. In this case, we split our open status into two internal states: idle and executing, as in the following diagram:
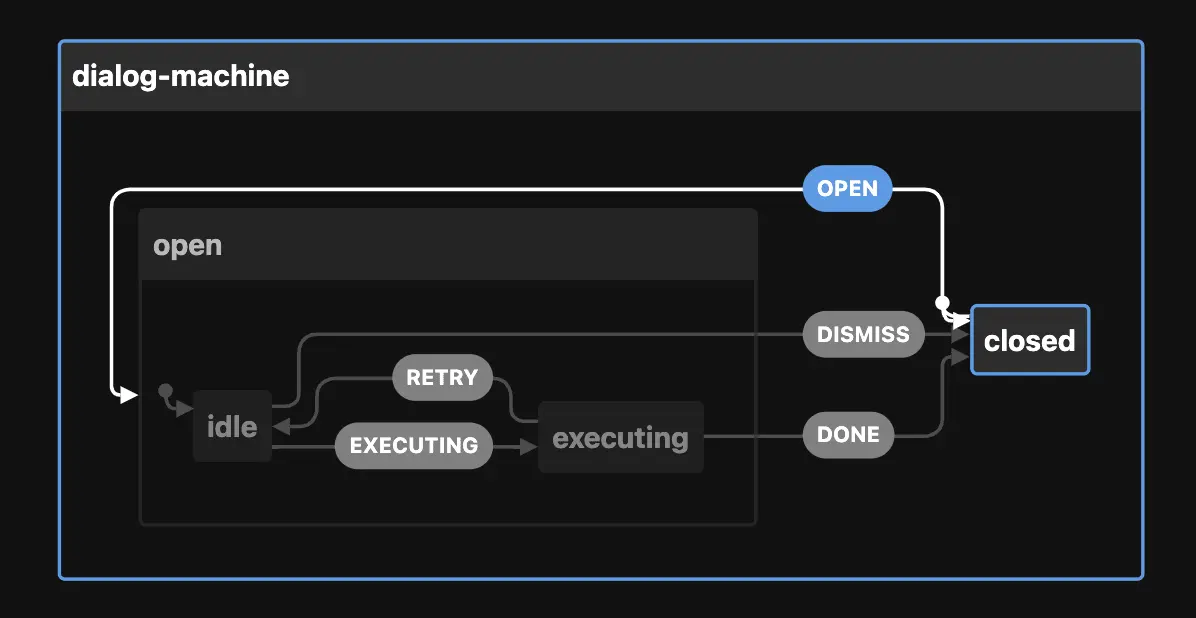
Indeed, we can transition to idle from the executing state and vice versa. And we transit from our primary state - open to closed through the open's nested state - executing. Thus our diagram contains the following state nodes:
closedopen.idleopen.executing
And we connect each state node through the following events (edges):
OPEN- (closed, open.idle)EXECUTING- (open.idle, open.executing)DISMISS- (open.idle, closed)RETRY- (open.executing, open.idle)DONE- (open.executing, closed)
We name each event in capital letters, representing the flow between the source state and the destination state node. We can now demonstrate our state machine diagram as below:
For each event transition, we want to trigger some additional actions to control the dialog's data context, such as:
- Initialize the context data when opening the dialog based on the inputs.
- Resetting the data context upon dismissing or closing the dialog.
- Invoking the custom action upon dialog confirmation (when in
executingstate). - Assign an error message to the context for displaying upon an error in invoking the confirmation.
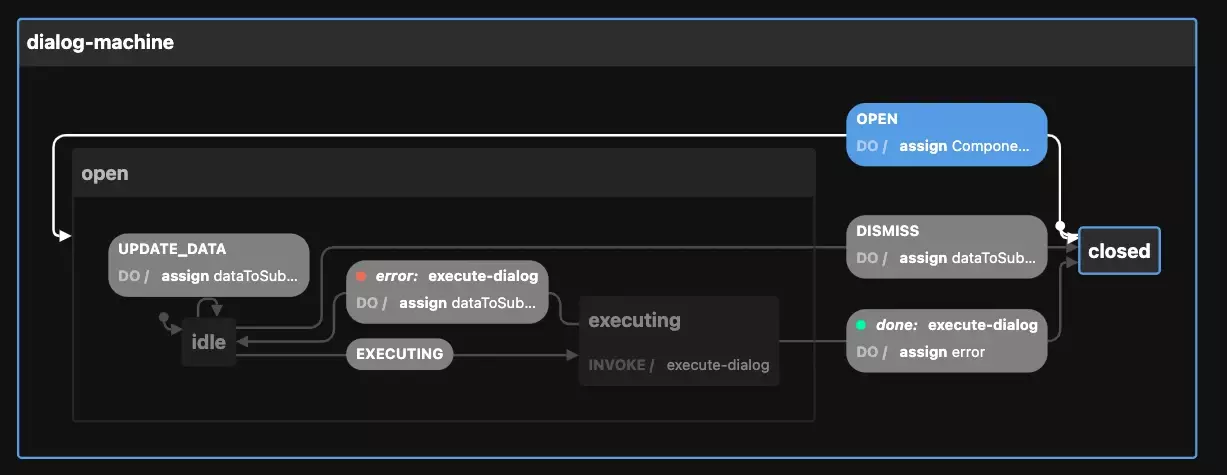
Our dialog state machine diagram now becomes:
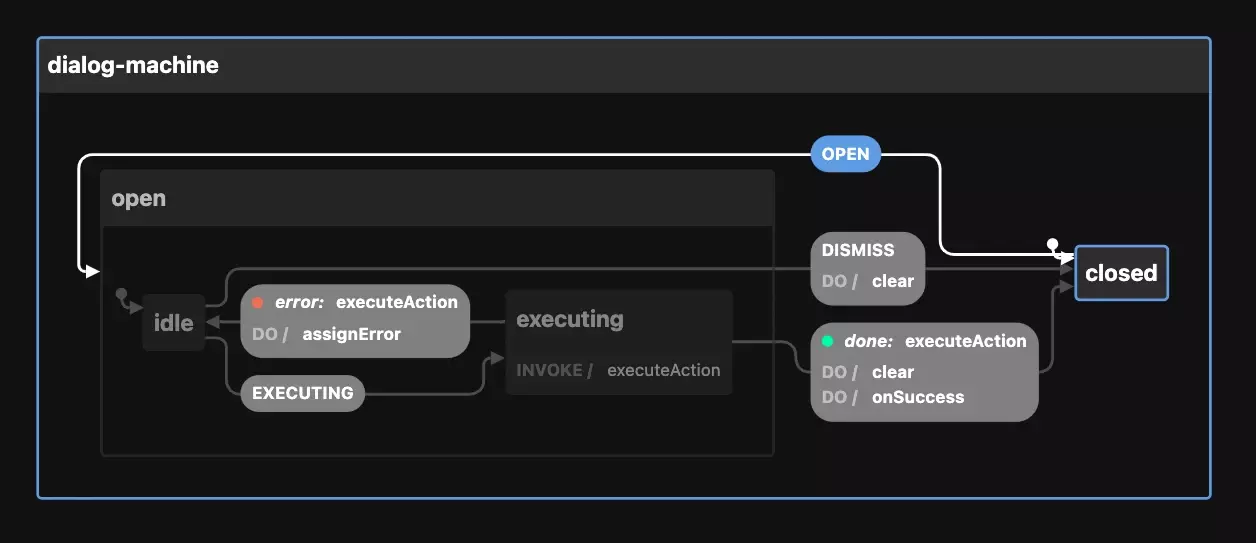
We can see now how the dialog mechanism should look by destructuring our dialog requirements into a representative graph.
The next step is to put this diagram into code with the help of the XState library.
Build the dialog machine with XState
XState is a JavaScript state management library using state machines and state charts. But let's not confuse it with VueX, Redux, or other standard state management libraries. In my view, XState is an explicit UI state management library, meaning it helps manage the state flow between different UI controls while also performing the data controls on the side.
You can install XState in your project using the following command:
npm i xstate

#OR
yarn add xstate
Once installed, you can create a state machine using createMachine from xstate package and pass the desired machine configurations as the method's input arguments.
import { createMachine } from 'xstate'

export const dialogMachine = createMachine({
    /* configurations */
})
There are a lot of fields for configuration APIs accepted by XState library. In this article, we will only take the following main configurations to set up our machine:
id- the unique identifier for the state machine.initial- the machine's required starting state (the entry point).context- the internal data of the machine. We use this field to store our customactionhandlers and custom dialog' options such astitle,dataToSubmit, etc.states- the object contains the definitions of all the possible states of the machine. We denote each state by a[key, value]pair, where thekeyis the state's name, and thevalueis the state's configuration object.
Below is the example structure of our dialog machine:
const configurations = {
    id: 'dialog-machine', //required unique id for the machine
    initial: '', // the starting state of the machine
    context: {
        //contains the initial values for internal data of the machine
    },
    states: {
        //contains all the possible states of the machine.
    },
}
Let's setup each State object under states. From our previous diagram, we define the two primary states - closed and open and define the initial state as closed:
const configurations = {
    id: 'dialog-machine',
    initial: 'closed',
    context: {
        //contains the initial values for internal data of the machine
    },
    states: {
        closed: {
            id: 'closed',
        },
        open: {
            id: 'open'
        }
    },
}
For the state open, we will also define its nested states idle and executing by using the object property states, in the same approach:
const configurations = {
    id: 'dialog-machine',
    initial: 'closed',
    context: {
        //contains the initial values for internal data of the machine
    },
    states: {
        closed: {
            id: 'closed',
        },
        open: {
            id: 'open',
            states: {
                idle: {
                },
                executing: {
                }
            }
        }
    },
}
But since open has its internal states, we need to determine its default state (initial state). This step is crucial for the machine to set its status correctly after transitioning to the open state. Since the dialog is open without any confirmation action performed by users, we set the initial state to be idle.
const configurations = {
    id: 'dialog-machine',
    initial: 'closed',
    context: {
        //contains the initial values for internal data of the machine
    },
    states: {
        closed: {
            id: 'closed',
        },
        open: {
            id: 'open',
            initial: 'idle',
            states: {
                idle: {
                },
                executing: {
                }
            }
        }
    },
}
Now let's add some events to our states.
Adding events between states
Each state object contains property on, which represents the object of events accepted to trigger transitioning from that state to others.
Each event object in XState has a property field target representing the id of the destination state to transition. For the closed state, the target for the OPEN event is the open state. This event allows the transition for the dialog from being closed to open.
const configurations = {
    id: 'dialog-machine',
    initial: 'closed',
    context: {},
    states: {
        closed: {
            id: 'closed',
            on: {
                OPEN: {
                    target: 'open',
                }
            }
        },
        open: {
            /*...*/
        }
    },
}
Since we set the default internal state of open to be idle, the transition from closed to open will automatically set the state machine to open.idle status.
The following events we need to create are EXECUTING when the user submits (or confirms) the dialog and DISMISS when the user chooses to close the dialog without performing any action.
const configurations = {
    id: 'dialog-machine',
    initial: 'closed',
    context: {},
    states: {
        closed: {
            /*...*/
        },
        open: {
            id: 'open',
            initial: 'idle',
            states: {
                idle: {
                    on: {
                        EXECUTING: {
                            target: 'executing'
                        },
                        DISMISS: {
                            target: '#closed'
                        }
                    }
                },
                executing: {
                }
            }
        }
    },
}
Note that we need to add # to indicate the parent-level state closed in the target state for the DISMISS event. Without it, XState will identify the target state as one of the internal states of open.
Similarly, for the executing state, we add the two following events:
RETRY, which will move the machine status back to theidlestate if there is an error executing the dialog actionDONEto close the dialog when the action execution completes successfully.
const configurations = {
    id: 'dialog-machine',
    initial: 'closed',
    context: {},
    states: {
        closed: {
            /*...*/
        },
        open: {
            id: 'open',
            initial: 'idle',
            states: {
                idle: {
                    /*...*/
                },
                executing: {
                    on: {
                        RETRY: {
                            target: 'idle'
                        },
                        DONE: {
                            target: '#closed'
                        }
                    }
                }
            }
        }
    },
}
So far, so good? We have just set up the basic configurations for our machine. The complete working code is as below:
import { createMachine } from 'xstate'

const configurations = {
    id: 'dialog-machine',
    initial: 'closed',
    context: {},
    states: {
        closed: {
            id: 'closed',
            on: {
                OPEN: {
                    target: 'open',
                }
            }
        },
        open: {
            id: 'open',
            initial: 'idle',
            states: {
                idle: {
                  on: {
                        EXECUTING: {
                            target: 'executing'
                        },
                        DISMISS: {
                            target: '#closed'
                        }
                    }
                },
                executing: {
                    on: {
                        RETRY: {
                            target: 'idle'
                        },
                        DONE: {
                            target: '#closed'
                        }
                    }
                }
            }
        }
    },
}

export const dialogMachine = createMachine(configurations)
To visualize our state machine and verify the flow, the XState team (or Stately team) developed a great Visualizer tool. The tool allows you to live coding your state machine, debug it visually and see how the transition flow works.
Below is how we can test the flow of our newly created dialog-machine machine with this tool.
This tool allows you to view the current state and the event it triggers whenever you move from one state to another using the State tab and Events tab, located on the right-side pane. This visualizer proves to be very useful in visualizing the state machine flow and verifying our machine logic at an early stage.
Next, we need to add actions to control the machine's data context for each event transition.
Adding events' actions
As discussed in the beginning, we want to perform the following data control actions for our dialog machine:
- Initialize the context data when opening the dialog based on the inputs.
- Resetting the data context upon dismissing or closing the dialog.
- Invoking the custom action upon dialog confirmation (in the
executingstate). - Assign an error message to the context for displaying upon an error in invoking the confirmation.
Let's work on each action requirement.
When opening, our dialog component should display the content dynamically in its template, besides the title header and the footer actions, as shown in the figure below:

It also includes binding to the correct external action execution whenever the user confirms the dialog. Hence the dialog machine should receive and keep some essential data in its context, such as the following:
- A component instance to render the content inside the dialog. The dialog renders a default "Dialog machine" text if no component is available.
- Title of the dialog
- Dialog button labels (confirm/submit, cancel)
- Executor for triggering upon user confirming the dialog.
- External data to pass to the executor if needed.
- Error to display in the dialog if needed.
We keep this data object within the state machine as its context. To update the context of the state machine, we use the assign API method from the xstate package and the state event's property field actions.
assign receives an object which defines how the machine should update each field of the current context. Each field is a function that accepts two parameters as below and returns the appropriate value to assign for that context field:
- The current
contextand - The current
eventtriggered.
For our OPEN event, we update the context based on the data passed with the event object, as shown below:
import { assign, createMachine } from 'xstate'

const configurations = {
    id: 'dialog-machine',
    initial: 'closed',
    context: {},
    states: {
        closed: {
            id: 'closed',
            on: {
                OPEN: {
                    target: 'open',
                    actions: assign({
                        Component: (context, event) => event.data.Component || 'Default Dialog',
                        executor: (context, event) => event.data.executor,
                        title: (context, event) => event.data.title,
                        confirmBtn: (context, event) => event.data.confirmBtn,
                        cancelBtn: (context, event) => event.data.cancelBtn,
                        dataToSubmit: (context, event) => event.data.dataToSubmit,
                    })
                }
            }
        },
        open: {
            /*...*/
        }
    },
}

export const dialogMachine = createMachine(configurations)
Next, as we previously defined in our state machine flow, we want to clear up all the saved data context whenever the user closes the dialog (through DISMISS or DONE).
Since we are performing the same action for both events, we can create a generic action clear, as follows:
const clear = assign({
    dataToSubmit: (_, event) => undefined,
    error: (_, event) => '',
    Component: (_, event) => undefined,
    executor: (_, event) => undefined,
})
Then pass it to the actions field of both events as part of an array, as shown below:
const configurations = {
    id: 'dialog-machine',
    initial: 'closed',
    context: {},
    states: {
        closed: {
            /*...*/
        },
        open: {
            id: 'open',
            initial: 'idle',
            states: {
                idle: {
                    on: {
                        EXECUTING: {
                            target: 'executing',
                        },
                        DISMISS: {
                          target: "#closed",
                          actions: [clear]
                        },
                    }
                },
                executing: {
                    on: {
                        RETRY: {
                            target: 'idle'
                        },
                        DONE: {
                            target: '#closed',
                            actions: [clear]
                        }
                    },
                }
            }
        }
    },
}
Since it indicates an error on the RETRY event, we want to update the context.error field while moving back to the idle state. We continue using assign to set up our context.error accordingly:
const configurations = {
    id: 'dialog-machine',
    initial: 'closed',
    context: {},
    states: {
        closed: {
            /*...*/
        },
        open: {
            id: 'open',
            initial: 'idle',
            states: {
                idle: {
                    /*...*/
                },
                executing: {
                    on: {
                        RETRY: {
                            target: 'idle',
                            actions: assign({
                                error: (_, event) => (event as any).data?.message || 'Error',
                            })
                        },
                        DONE: {
                            target: '#closed',
                            actions: [clear]
                        }
                    },
                }
            }
        }
    },
}
Also, we want to update dataToSubmit without transition between states. This update is essential in a scenario where we want to trigger a custom action such as a form submission for the dialog's content component. To achieve this goal, we create a new event UPDATE_DATA for the idle state, with a single action, as follows:
const configurations = {
    id: 'dialog-machine',
    initial: 'closed',
    context: {},
    states: {
        closed: {
            /*...*/
        },
        open: {
            id: 'open',
            initial: 'idle',
            states: {
                idle: {
                    on: {
                        EXECUTING: {
                            target: 'executing',
                        },
                        DISMISS: {
                            target: "#closed",
                            actions: [clear]
                        },
                        UPDATE_DATA: {
                            actions: assign({
                                dataToSubmit: (_, event) => event.data,
                            })
                        }
                    }
                },
                executing: {
                    /*...*/
                }
            }
        }
    },
}
We have completed setting the required actions for opening and closing the dialog, assigning the error when needed, and updating the saved data for passing to the custom action.
Now we will look at our executing state, where we must invoke our custom executor.
Invoking a service action on a state
In XState, we use actions to perform context updating. We can also use it to invoke a custom action. However, if the custom action is asynchronous, and there is a need to transit to different states depending on that action execution status, we have to create a dedicated state to handle that. In our dialog machine, executing is such a state.
XState offers an invoke property object field for the state's configuration object to invoke additional logic in a state. Once the dialog is in the executing state, it needs to trigger the custom executor with dataToSubmit, if any, immediately. Upon the execution status, it will redirect the machine back to an idle state (if error) or closed (if the execution is successful). Below is an example structure of the invoke field that we use for our dialog machine:
invoke: {
    src: 'executeAction', //the source for the invoking service, can be a string or function
    id: 'execute-dialog', //required identifier for the invoke logic source
    onDone: {}, //transition event object when service action's returned promise resolves
    onError: {} //transition event object when action returned promise rejects
},
src is where we define the logic for invoking. It can be a string indicating the name of the service action passed to the machine during its creation or a function method that receives context and event as its arguments and returns a Promise.
Let's define executeAction as below:
const executeAction = async (context, event) => {
    const { dataToSubmit } = context;
    return context.executor?.(dataToSubmit);
}
Then bind it to the src field:
invoke: {
    src: executeAction,
    id: 'execute-dialog', //required identifier for the invoke logic source
    onDone: {}, //event object for DONE event
    onError: {} //event object for ERROR event
},
A significant benefit of using invoke is that it automatically provides binding to onDone and onError for asynchronous functions. Once the function resolves, the machine will trigger the onDone transition. Otherwise, it starts onError accordingly.
Previously, we defined our DONE and RETRY events for the executing state. With invoke, we can move the content inside DONE to onDone, and from RETRY to onError respectively, and remove the on field completely. The code for executing state now becomes:
    executing: {
        invoke: {
            src: executeAction,
            id: 'execute-dialog',
            onError: {
                target: 'idle',
                actions: assign({
                    error: (_, event) => (event as any).data?.message || 'Error',
                })
            },
            onDone: {
                target: '#closed',
                actions: [clear]
            }
        },
    }
Below is the complete working code for our dialog machine:
import { assign, createMachine } from 'xstate'

const clear = assign({
    dataToSubmit: (_, event) => undefined,
    error: (_, event) => '',
    Component: (_, event) => undefined,
    executor: (_, event) => undefined,
})

const executeAction = async (context, event) => {
    const { dataToSubmit } = context;
    return context.executor?.(dataToSubmit);
}

const configurations = {
    id: 'dialog-machine',
    initial: 'closed',
    context: {},
    states: {
        closed: {
            id: 'closed',
            on: {
                OPEN: {
                    target: 'open',
                    actions: assign({
                        Component: (context, event) => event.data?.Component || 'Default Dialog',
                        executor: (context, event) => event.data?.executor,
                        title: (context, event) => event.data?.title,
                        confirmBtn: (context, event) => event.data?.confirmBtn,
                        cancelBtn: (context, event) => event.data?.cancelBtn,
                        dataToSubmit: (context, event) => event.data?.dataToSubmit,
                    })
                }
            }
        },
        open: {
            id: 'open',
            initial: 'idle',
            states: {
                idle: {
                    on: {
                        EXECUTING: {
                            target: 'executing',
                        },
                        DISMISS: {
                          target: "#closed",
                          actions: [clear]
                        },
                    }
                },
                executing: {
                    invoke: {
                        src: executeAction,
                        id: 'execute-dialog',
                        onError: {
                            target: 'idle',
                            actions: assign({
                                error: (_, event) => (event as any).data?.message || 'Error',
                            })
                        },
                        onDone: {
                            target: '#closed',
                            actions: [clear]
                        }
                    },
                }
            }
        }
    },
}

export const dialogMachine = createMachine(configurations)
Create an extendable machine with the second input argument of createMachine
At this point, our dialog machine is ready for use. However, since some actions such as clear and executeAction are defined locally, we won't be able to extend the machine and customize these actions for future use without directly making changes to the original machine. Luckily, createMachine accepts the 2nd parameter, which is an object that contains additional options such as standard services (for invoking services), guards, and actions (for event data actions) to use in the machine.
Let's move our clear and executeAction to their respective location in this object, as shown below:
const options = {
    services: {
        executeAction: async (context, event) => {
            const { dataToSubmit } = context;
            return context.executor?.(dataToSubmit);
        }
    },
    actions: {
        clear: assign({
            dataToSubmit: (_, event) => undefined,
            error: (_, event) => '',
            Component: (_, event) => undefined,
            executor: (_, event) => undefined,
        })
    }
}
And in our machine states, we can replace the direct function binding by passing the names clear and executeAction, and XState will handle the rest of the binding:
const configurations = {
    id: 'dialog-machine',
    initial: 'closed',
    context: {},
    states: {
        closed: {
            /*...*/
        },
        open: {
            id: 'open',
            initial: 'idle',
            states: {
                idle: {
                    on: {
                        EXECUTING: {
                            target: 'executing',
                        },
                        DISMISS: {
                          target: "#closed",
                          actions: ['clear']
                        },
                    }
                },
                executing: {
                    invoke: {
                        src: 'executeAction',
                        /*...*/
                        onDone: {
                            target: '#closed',
                            actions: ['clear']
                        }
                    },
                }
            }
        }
    },
}
That's it. Below is the final working code:
import { assign, createMachine } from 'xstate'

const options = {
    services: {
        executeAction: async (context, event) => {
            const { dataToSubmit } = context;
            return context.executor?.(dataToSubmit);
        }
    },
    actions: {
        clear: assign({
            dataToSubmit: (_, event) => undefined,
            error: (_, event) => '',
            Component: (_, event) => undefined,
            executor: (_, event) => undefined,
        })
    }
}

const configurations = {
    id: 'dialog-machine',
    initial: 'closed',
    context: {},
    states: {
        closed: {
            id: 'closed',
            on: {
                OPEN: {
                    target: 'open',
                    actions: assign({
                        Component: (context, event) => event.data?.Component || 'Default Dialog',
                        executor: (context, event) => event.data?.executor,
                        title: (context, event) => event.data?.title,
                        confirmBtn: (context, event) => event.data?.confirmBtn,
                        cancelBtn: (context, event) => event.data?.cancelBtn,
                        dataToSubmit: (context, event) => event.data?.dataToSubmit,
                    })
                }
            }
        },
        open: {
            id: 'open',
            initial: 'idle',
            states: {
                idle: {
                    on: {
                        EXECUTING: {
                            target: 'executing',
                        },
                        DISMISS: {
                          target: "#closed",
                          actions: ['clear']
                        },
                    }
                },
                executing: {
                    invoke: {
                        src: 'executeAction',
                        id: 'execute-dialog',
                        onError: {
                            target: 'idle',
                            actions: assign({
                                error: (_, event) => (event as any).data?.message || 'Error',
                            })
                        },
                        onDone: {
                            target: '#closed',
                            actions: ['clear']
                        }
                    },
                }
            }
        }
    },
}

export const dialogMachine = createMachine(configurations, options)
And if you are using TypeScript, below is the data interface example for the dialog machine's context:
export interface DialogMachineContext {
    Component?: Component | string;
    executor?: (data?: any) => Promise<any>;
    title?: string;
    confirmBtn?: string;
    cancelBtn?: string;
    dataToSubmit?: any;
    error?: string;
}
The entire dialog diagram generated by the Visualizer tool is as below:
Our dialog machine is now complete and extendable. We can move forward to use it in a Dialog Manager component, either in React with @xstate/react, or in Vue with @xstate/vue hooks.
Resources
- API documentation for XState here: https://xstate.js.org/docs
- Great tutorial for XState: https://egghead.io/q/xstate
- Vurian component library project using XState and Vue: https://github.com/mayashavin/vurian-wizard
- State machine visualizer tool
Summary
Working with a state machine is fun and challenging at the same time. It requires a bit of a learning curve and quite a change in how you usually proceed in working on a new feature/component. To build a proper state machine, you must define and plan ahead of your component/feature flow, module it in parts, and then code. I find it very helpful in organizing my code and creating a state system for managing my UI components, such as the dialogs.
Now that we know how to create a dialog manager machine with XState, let's make our reusable and generic dialog component in Vue or React, together with the dialog element, shall we? 😉
👉 If you'd like to catch up with me sometimes, follow me on Twitter | Facebook.
Like this post or find it useful? Hit the share button 👇🏼 😉
Learning Vue
Learn the core concepts of Vue.js, the modern JavaScript framework for building frontend applications and interfaces from scratch