
Nuxt Content module is fantastic, but it requires content to be in the same project with our codebase. Can we keep the content away from the code, or have it managed privately? And what's the role of the Git submodule in this case?
Let's find out.
The Nuxt Content module
Nuxt.js, with the Content module as a Git-based headless CMS (Content Management Service), is excellent, especially for developers. It offers us many out-of-the-box features such as easy automatic markdown rendering, live preview, content hook, and beautiful code highlighting without extra tweaking. The idea of having full control of your content, not rely on any third-party platform, and dealing with just markdown syntax is merely fantastic. Less code, less setup, and more flexibility 😉.
So, how do we start using it?
Install Nuxt content module
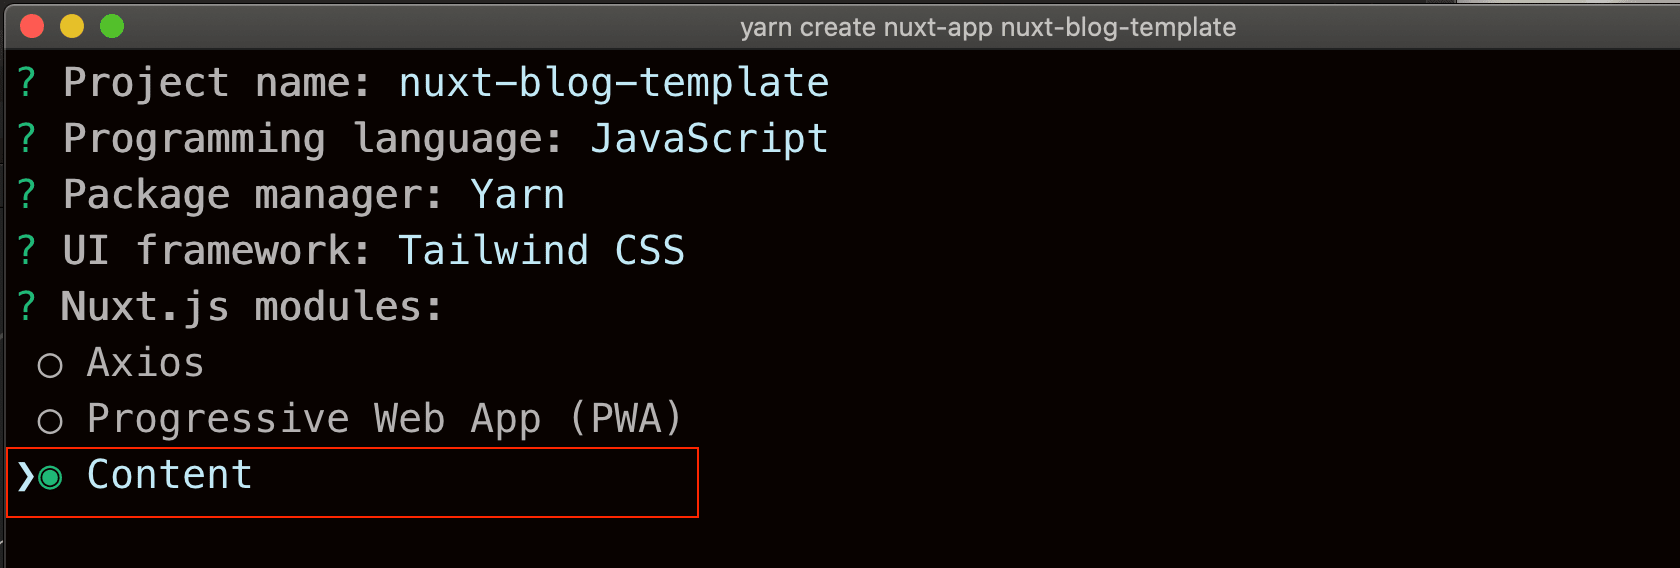
For a new project, use the following command to create one:
yarn create nuxt-app your-project-name
Then choose Content in the options for Nuxt.js modules.
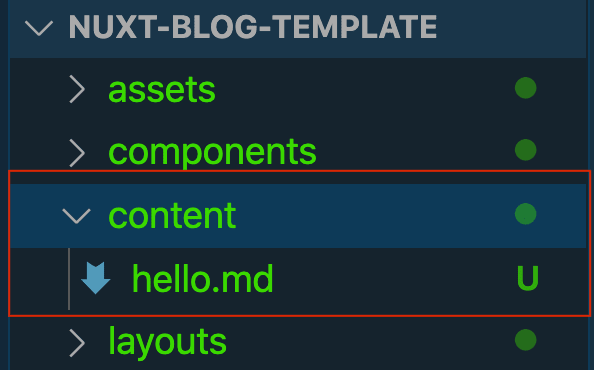
Upon creating the project, it will do the following:
- Install the npm package
@nuxt/content, - Create the folder
contentwith an[example.md](http://example.md)file as the entry point to your content management, - Add
@nuxt/contenttomoduleslist innuxt.config.js, and - Add an empty
contentobject innuxt.config.jsas configurations for the Content module./* nuxt.config.js */ export default { modules: [ '@nuxt/content' ], content: { // configurations } }
Otherwise, you can run the following to install the Content module in your project manually:
yarn add @nuxt/content
And then perform the above steps yourself to have it set up and running.
By default, the entry point for the module to look for content is the content directory.
You can change this entry point by override the dir field of content object in nuxt.config.js
/* nuxt.config.js */
export default {
 content: {
  dir: 'my-content' // read content from my-content/
 }
}
You can also config the module settings per needs following its documentation.
Fetch and render content with Content module
Once finished the setup, the module will inject a $content instance globally, meaning we can access this instance using this.$content (or context.$content for plugins) within the project.
The $content is a method instance which receives two parameters - a path to a specific content document or directory and an optional options which contains additional information, and returns a chain sequence. To fetch content from a file or directory, we use its chained method fetch(). For example:
const document = await $content('hello').fetch()
The Nuxt engine will fetch the file or directory following the path content/hello, and return its content as an Object (if it is a file), and an Array of Object (if it is a directory). Upon receiving the result, which is content from a file in this case, we can use nuxt-content component to display the fetched content, as shown below:
<template>
 <div>
  <nuxt-content :document="document" />
 </div>
</tempate>
<script>
export default {
 async asyncData() {
  const document = await $content('hello').fetch()

  return { document }
 }
}
</script>
And the component will display the fetched document with the content given in the hello.md file.

Great, isn't it? But what if we want to fetch content from a different source, for example, a separate content repository? What if we are going to keep the content private while the project code is public?
Does Nuxt Content support it? Let's find out.
The privacy and the CMS challenge
Even though Nuxt Content can act as a headless CMS, there is a limitation. With the current version (v1.9.0), all the content within the content folder resides in the same project repository, for $content to be able to fetch them. It brings two problems:
- The head (the project itself - the front-end) is not detached fully from the body (the content repository - the back-end). Thus it is not completely a headless CMS as it could have been.
- If your repository is public, your content will also be exposed.
In general, it is not a good practice to do so. Reasons can be about the project's scalability, or more critical - the privacy of your content. All the blog posts, including drafts and new blog ideas, are exposed on GitHub repo, regardless of your intention.
To solve this problem, hosting the content in a separate repo or an independent platform may be a good idea. But it means you can’t fully use the Content Module. And we don’t want to miss out on the core feature of Nuxt Content. Because, why not?
That’s when Git Submodule comes to the rescue.
Git submodule
Often we need to use some external and private code (specific algorithm code, for instance) while working in a particular repository project. Or other projects need those external codes, too. Copy/paste may be an option, but it is against our golden DRY (Don’t Repeat Yourself) rules. Also, it does not guarantee the code privacy.
The Git submodule is designed precisely for solving this.
A Git submodule is a static SHA-1 reference that:
- Resides within a Git repository (the consumer or the main repo), and
- Refers (ties) to a specific commit in an external Git repository (the submodule).
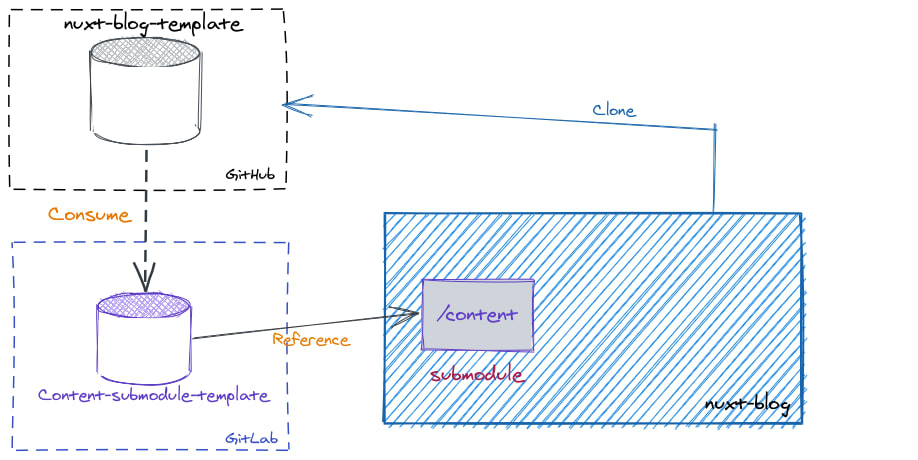
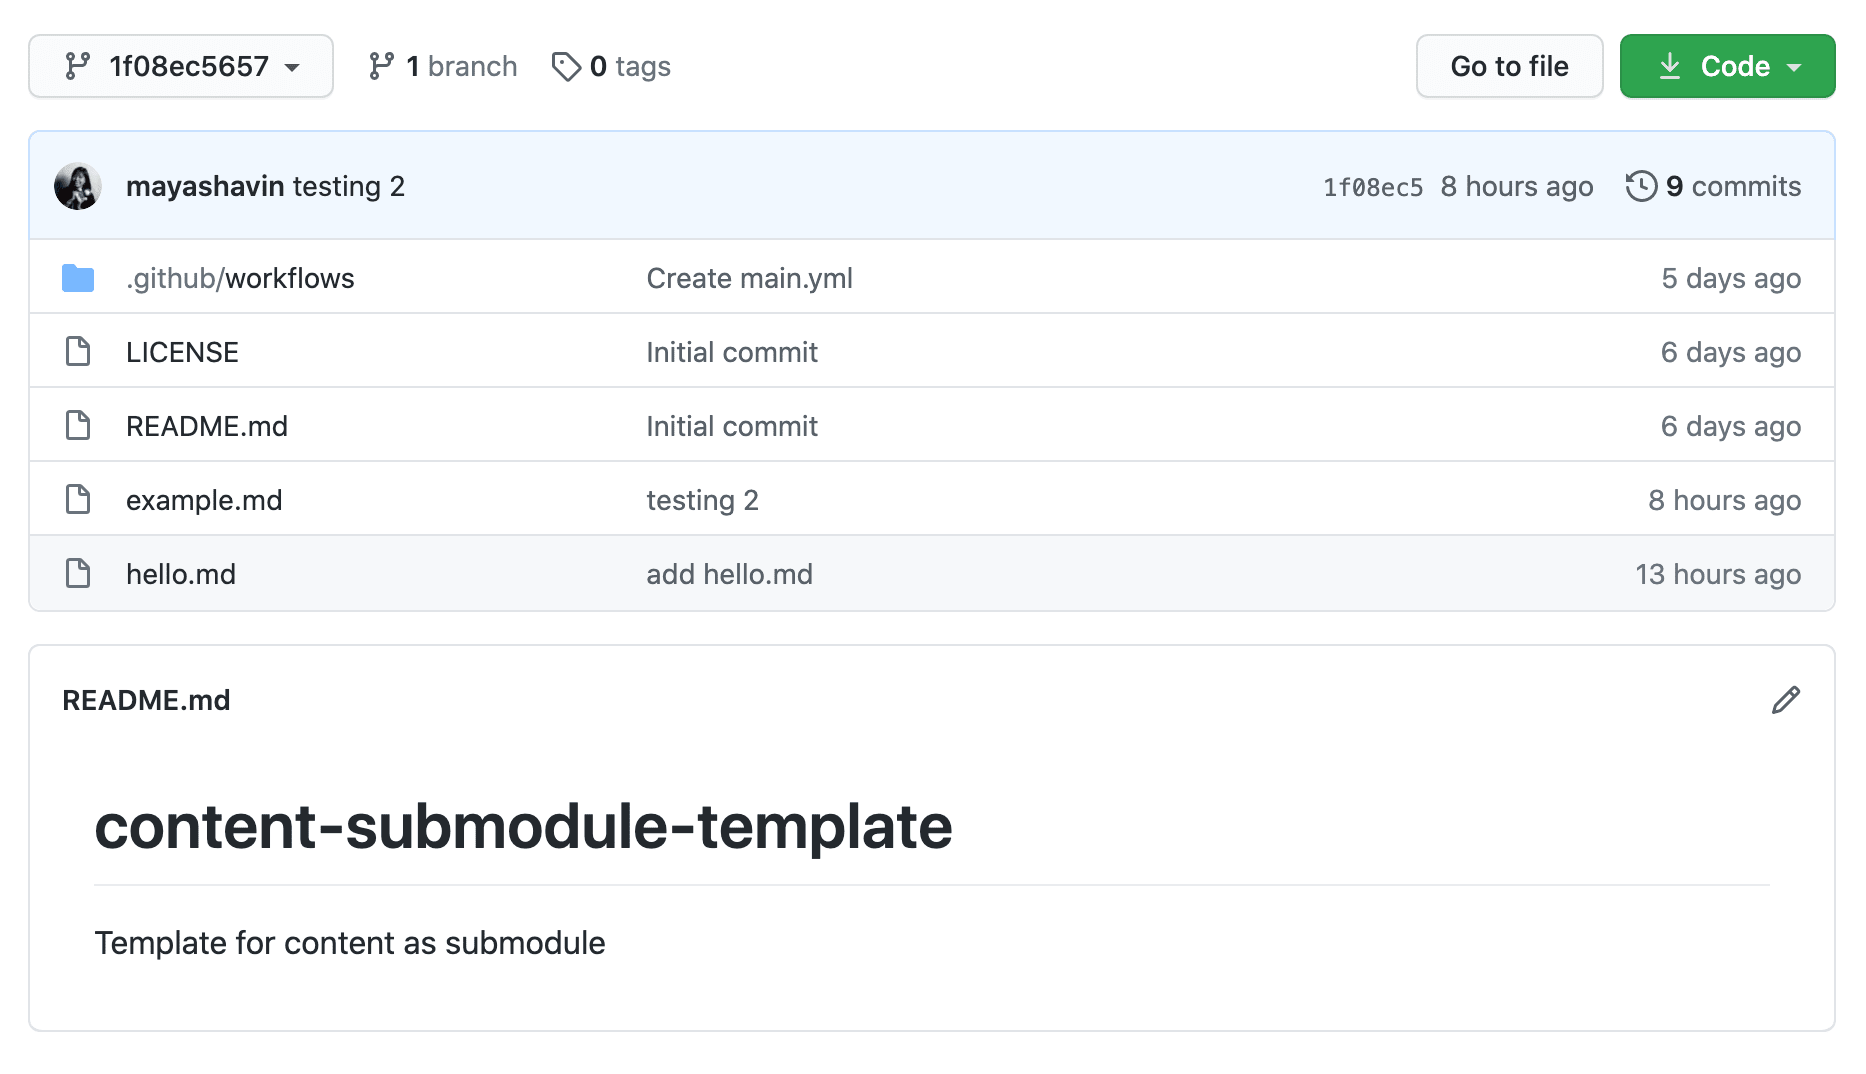
We can connect the external Git repository - content-submodule-template as a content submodule inside nuxt-blog-template repository to use. And since the submodule repo is a Git repository, we absolutely can link any BitBucket (or a GitLab) repository as submodule to a GitHub repository and vice versa.
From the outside, the reference folder of the submodule repo content remains empty, with a specific commit ref, as shown below:
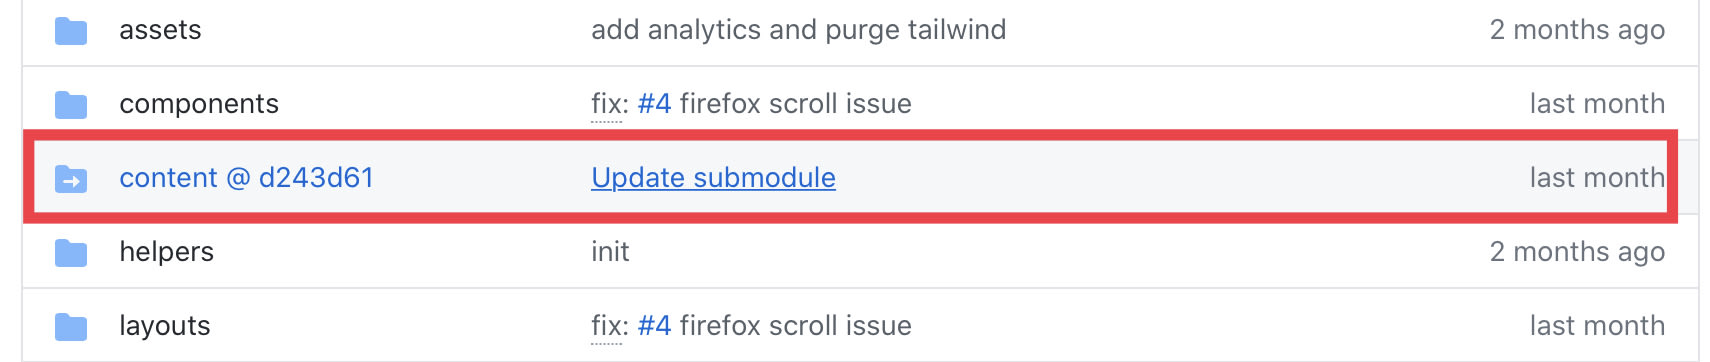
And clicking on that folder will result in a 404 page if the repository is private.

Otherwise, it will redirect to the submodule repository’s Github location.
Using git submodule
To consume a repository content-submodule-template as a submodule, we need to perform four simple steps:
- Create the new repository
content-submodule-template, this will be our submodule. - Create our sample Nuxt project
nuxt-blog-template, navigate to project root directory.yarn create-nuxt nuxt-blog-template && cd nuxt-blog-template - Remove the sample
contentfolder created by Nuxt.js boilerplate (if there is). - Add the
content-submodule-templaterepository as the submodulecontentofnuxt-blog-templateusing the following command syntax:git submodule add <link-to-your-content-repo> <path-directory>
In which, we replace<path-directory>with our desired folder name -content. And the link to the submodule repo can be found by clicking on theCodebutton and select the desired link - HTTPS or SSH.
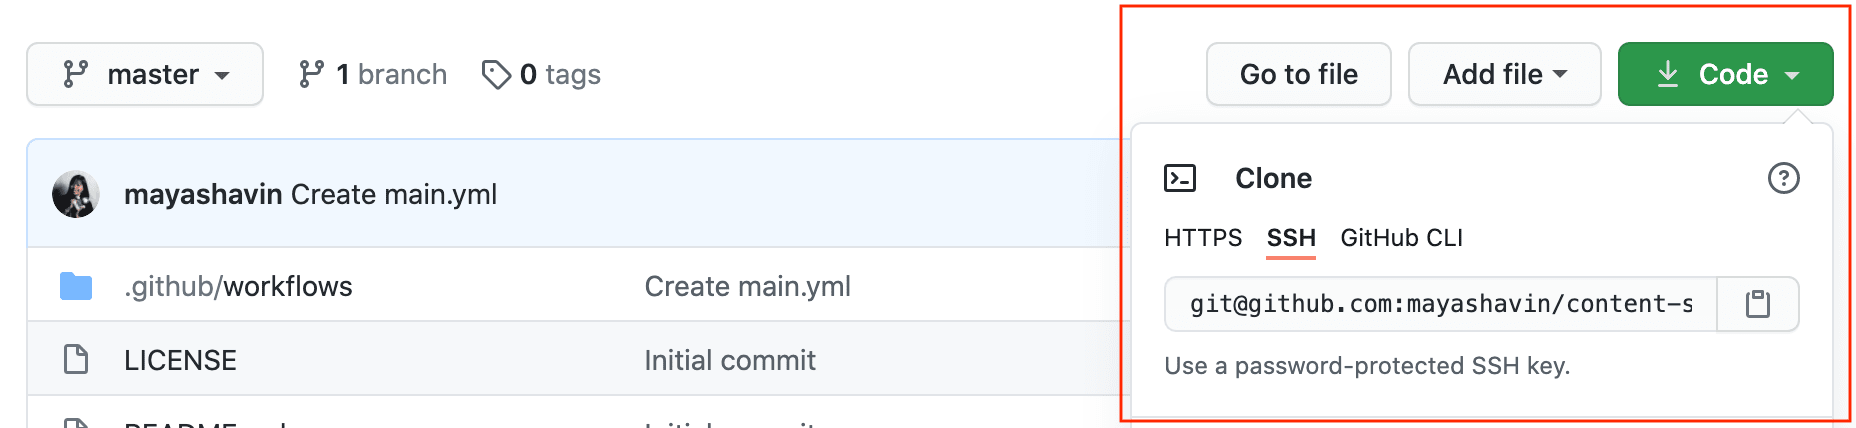
The full command is:
git submodule add git@github.com:mayashavin/content-submodule-template.git content
Finally, we execute the following to initialize the submodules and any nest ones' content into the created folder. Otherwise, there won't be any content in the cloned folder if it contains other submodules.
git submodule update --init
Tip: Another alternative way to clone and initialize the submodules with content is to use the flag --recurse-submodules when using git clone . It automatically initializes and updates each submodule in the repository, including the nested ones.
git clone --recurse-submodules git@github.com:mayashavin/content-submodule-template.git content
Once done, Git will automatically clone the latest version of the submodule repo into the target directory.
Also, it adds to the root directory a new file .gitsubmodules, which contains the information of all submodules used within the current repo:

Note: Pulling a Git submodule using git submodule update command detaches the HEAD from the remote submodule repo at a given commit, as seen below:

That’s it. We can start using the code in the submodule within our project!
Next question - how do we make sure our submodule is up-to-date?
Synchronize the submodule
A Git submodule is static. Hence the synchronization between the submodule repository and its consumer repository doesn’t happen automatically. Similarly to the consumer-product relationship, the submodule repo isn't aware of who is consuming it. On the other hand, consumer repo doesn't know when and whether the submodule has an update. Hence to keep the submodule up-to-date in the consumer’s side, we need to synchronize it manually, by using the following command:
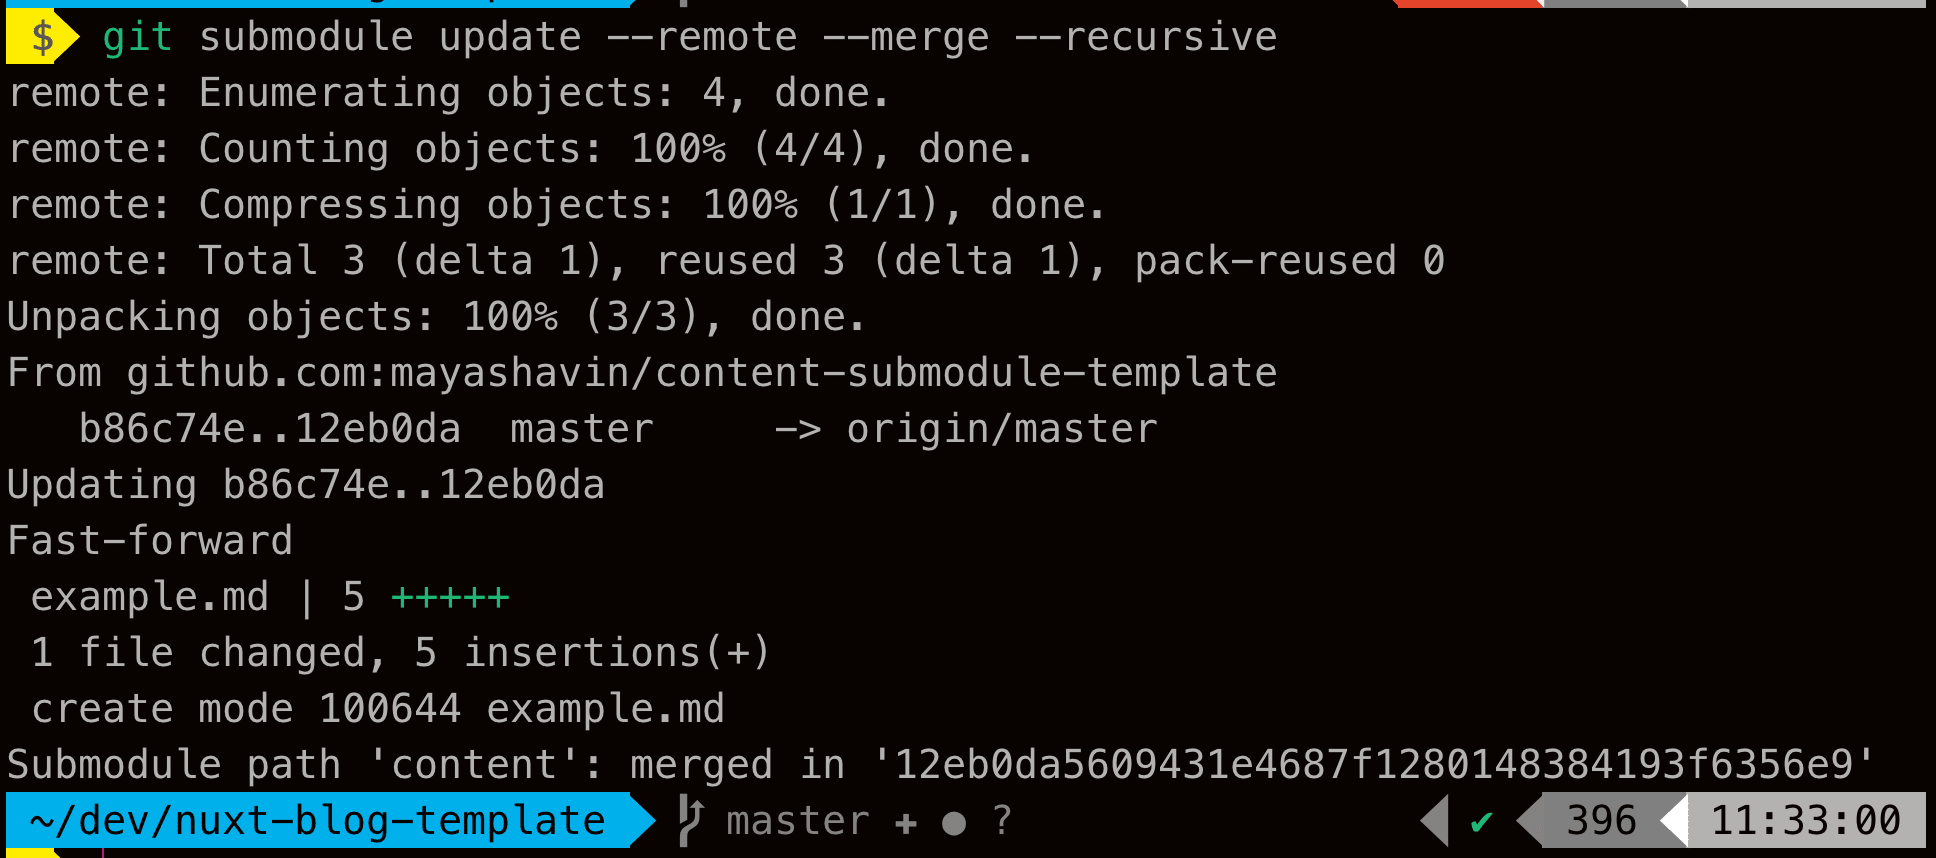
git submodule update --remote --merge --recursive
In which:
—-remote - we use this flag to perform synchronization with the original remote repository, without having to run git pull in each submodule of the project. It is recommended to use this optional flag to integrate changes from the upstream project with the current remote HEAD and make sure the reference SHA-1 is updated.
--merge - If you make changes to the submodule locally in the consumer project, you can use the flag to enable merging the remote updates into your current changes of the submodule. This flag doesn't guarantee any push and merge any committed change back to the remote repo.
—-recursive - we use this flag to include all the sub submodules if there are any.
Once triggered, Git will update the HEAD to the newest commit in the remote submodule repository.
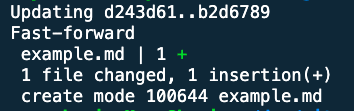
For example, if we add a new file example.md to the remote content-submodule-template submodule repository
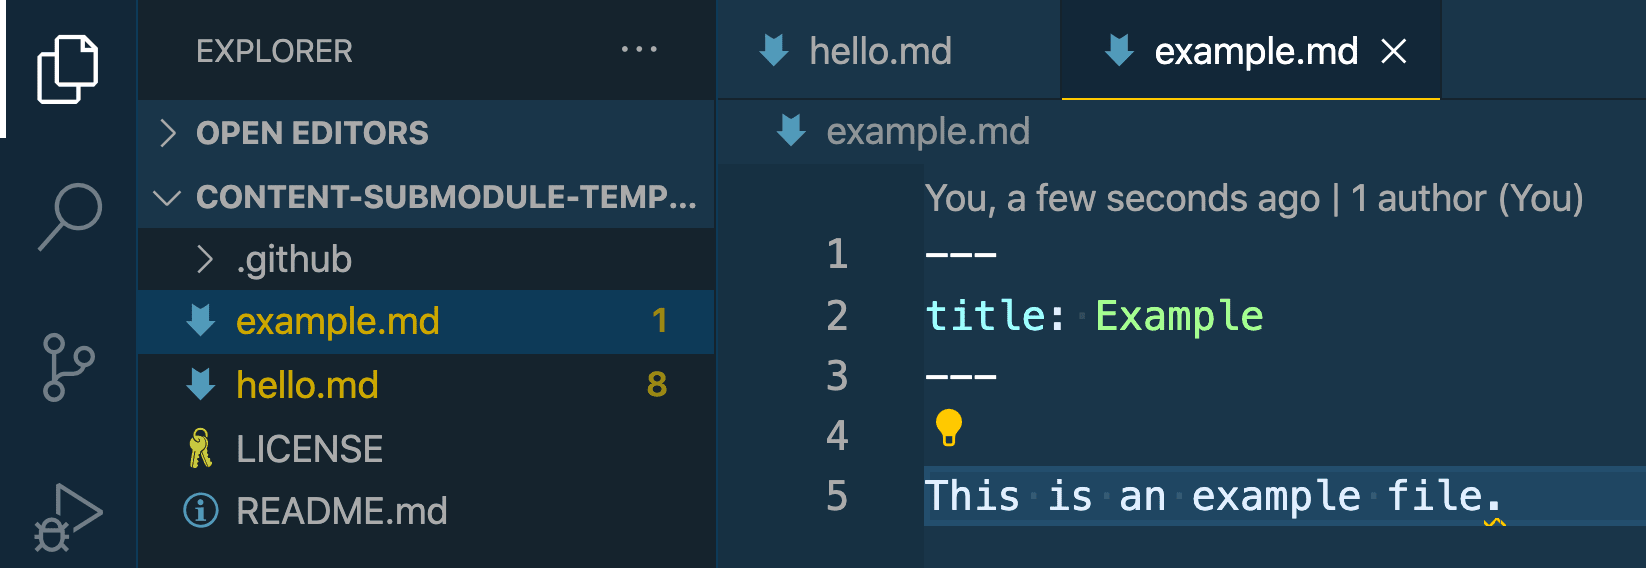
We need to run the above command, and the submodule used in nuxt-blog-template will be updated with the latest content immediately.
And to make sure your main repo - nuxt-blog-template reflects this update, you have to commit and push this change on new submodule reference to the remote repository. You can do it by executing the following commands on the terminal:
git add content
git commit -m "Update submodules ref"
git push origin master
So far, so good? What about committing local changes to the submodule directly from the main repository?
Make changes for submodule from main consumer repository
The submodule is a Git repository. Hence we certainly can perform the basic Git operations, such as fetching, committing changes, and pushing them to the remote submodule repository. To commit and push changes without cloning and opening the original submodule repository in a separate window, we execute the following steps in the terminal:
- Navigate to the submodule module.
cd content/ - Make the desired changes and stage them.
#Add all the changes regardless git add . - Write a meaningful commit message.
git commit -m "chore(docs): Update content example" - Push to the remote branch
master(or any branch of the remote repository we are using for submodule).git push origin master - At this point, the reference of the submodule in the main repository has changed. Thus, we have to perform another commit the new reference of the submodule
contentand push it to the main remote repository, as shown in the previous section.
Alternatively, suppose your IDE is VS Code. In that case, we can use the built-in Git support for such tasks, with better developer experience and less typing 😉.
Updating Git submodules in VSCode
VSCode - Visual Studio Code - has built-in Git support, with the required Git version from 2.0.0 onwards. You can view the local changes, detected repositories by selecting the Source Control icon on the left sidebar (or Ctrl ^ + Shift + G).
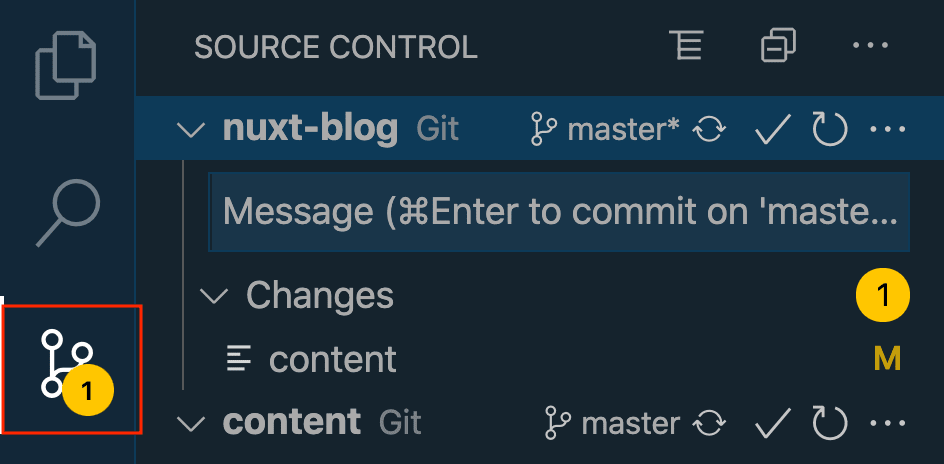
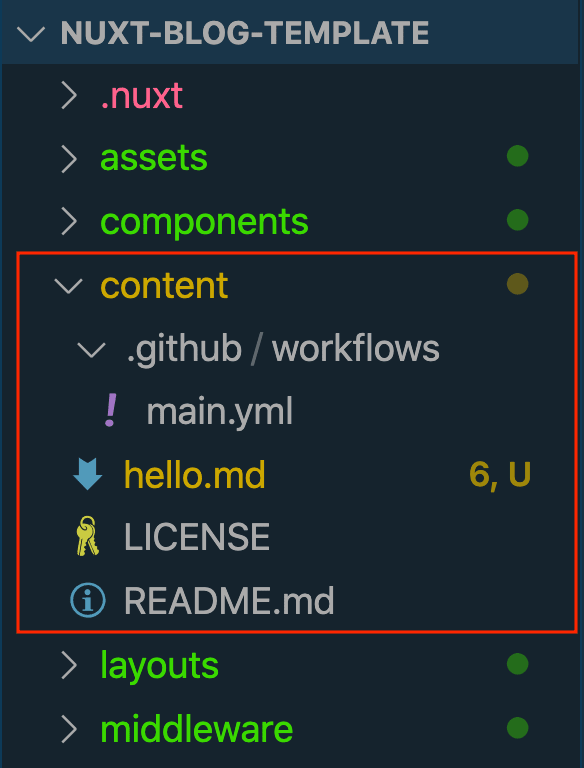
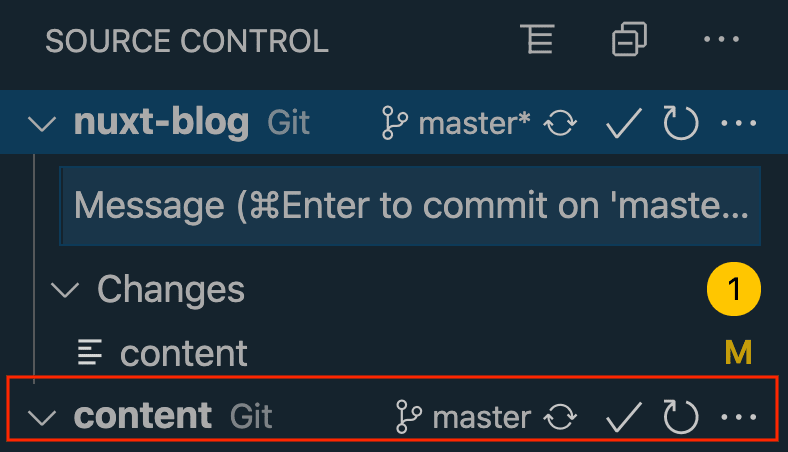
When we add a submodule to the current project, the source control also detects and shows it as a repository. For example, below, we can see the submodule content displayed as a Git repository.
However, the Git support in VSCode is still very essential. It has the most basic features such as: initialize, clone a repository, create branches, stage and commit changes, pull/push/merge with a remote branch, resolve conflicts, etc. Thus, we still need to use the CLI command to add and sync the Git submodules.
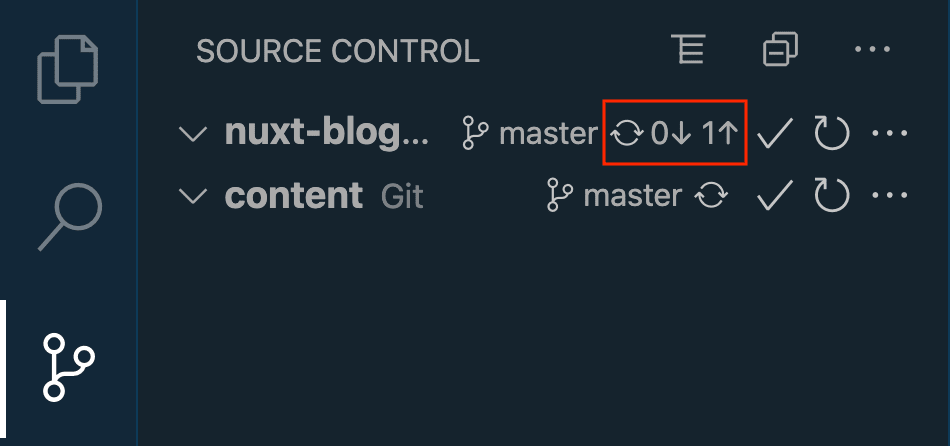
Nevertheless, we can update the submodule reference for the main repository by performing the following:
- Once the submodule is in synch with its remote repository, the reference address will be updated automatically, and
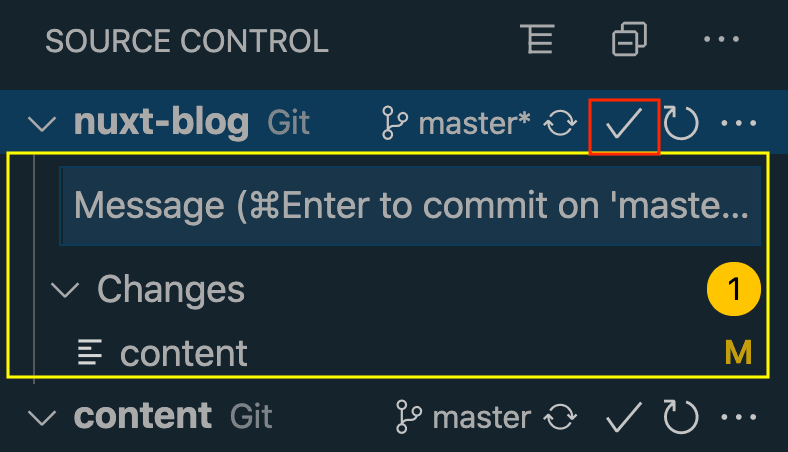
contentwill appear in the list of changes for the main project repository, ready to be staged in committed. - We can hover on the
contentrow inside the list and click on+sign to stage the file explicitly, or enter the message in theMessagefield and confirm committing all changes, as shown below: - Once confirmed, we can push the commit directly to the remote branch by clicking on the same row where the repository is listed:
Similarly, we can also make changes to the submodule content locally, then push those changes to the remote repository using this Git support in VSCode. We can also perform a fetch/pull from the remote submodule repository to get the latest update or create/switch to a different remote branch.
Besides, it's important to note that if you make commits to the submodule content, make sure you push them before running git submodule update --remote --merge --recursive. Otherwise, you may run into the disappeared commit problem, which we will address in the next section.
Regardless, I strongly recommend you using git submodule update --remote --merge --recursive afterward to avoid potential Git errors.
Troubleshooting
Working with Git submodules can be challenging. It requires executing commands in order and handling with more attention. Even then, you can find yourself in some weird Git problems, whose solution may not be as straightforward as it should be. The following examples are the common problems we may encounter while working with Git submodules, from my personal experiences 🤯.
Push a disappeared commit after updating the submodule
Assume we accidentally run git submodule update --init before pushing the current commits we did for the submodule from the main repository. In that case, our local reference will sometimes reset to the last updated SHA-1, meaning our commits will disappear. And git status will show nothing.
Don't be panic; run the following command:
git reflog
This command shows us the information recorded in the reflogs, which contains records of when the tips of branches and other references were updated in a local repository.

Note: HEAD@{2} means "where HEAD used to be two moves ago"
Now we choose the relevant commit (here it's b2d6789 with commit message commit: test and run the git merge command as follow:
git merge b2d6789
It will merge the target commit to the current branch of the submodule:
And we can safely push to the remote branch of the submodule repository 🎉.
💡 Tip: Always avoid using git submodule init or git submodule update --init unless it's for initializing a submodule. In most cases, these commands won't do what it is supposed to do (been there - done that). Instead, you should use git submodule update --remote --merge --recursive or perform fetch/pull/push regularly inside the submodule directory.
Cool. What should we do if we want to remove a submodule from our project?
Delete a submodule
We can remove a Git submodule from our project in two straightforward steps:
- Delete the local submodule configurations stored by:
git submodule deinit <submodule-folder-name>
This command will also delete the referencing line of the submodule in.git/configfile. - Remove the submodule files from the project and the remaining
.gitfolders.git rm <submodule-folder-name>
Here comes the last and most important question - does use Git submodule require special support for deployment from hosting platforms?
Deployment
Due to the nature of Git submodules and different levels of privacy permission involved, continuous deployment (CD) with it can be challenging. Not all hosting platforms are configurable to work with Git submodules. The next section will examine how to deploy using the two popular services - Netlify and Vercel.
Deployment with Netlify
The excellent news is Netlify supports Git submodules out of the box. If the submodule repository is public and its repository link is in https format, no further action is required.
Suppose the submodule is private or configured using SSH link format. In that case, we can easily enable continuous deployment with Git submodules in three simple steps:
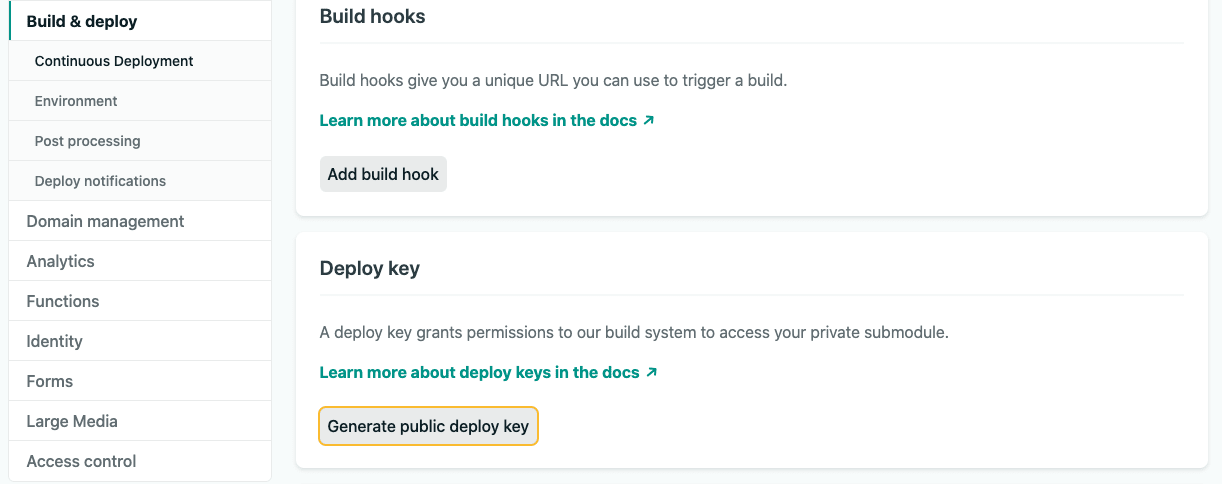
- In your Netlify project's dashboard, go to Settings, select Build & Deploy on the sidebar, scroll down to the Deploy key and generate a public deploy key.
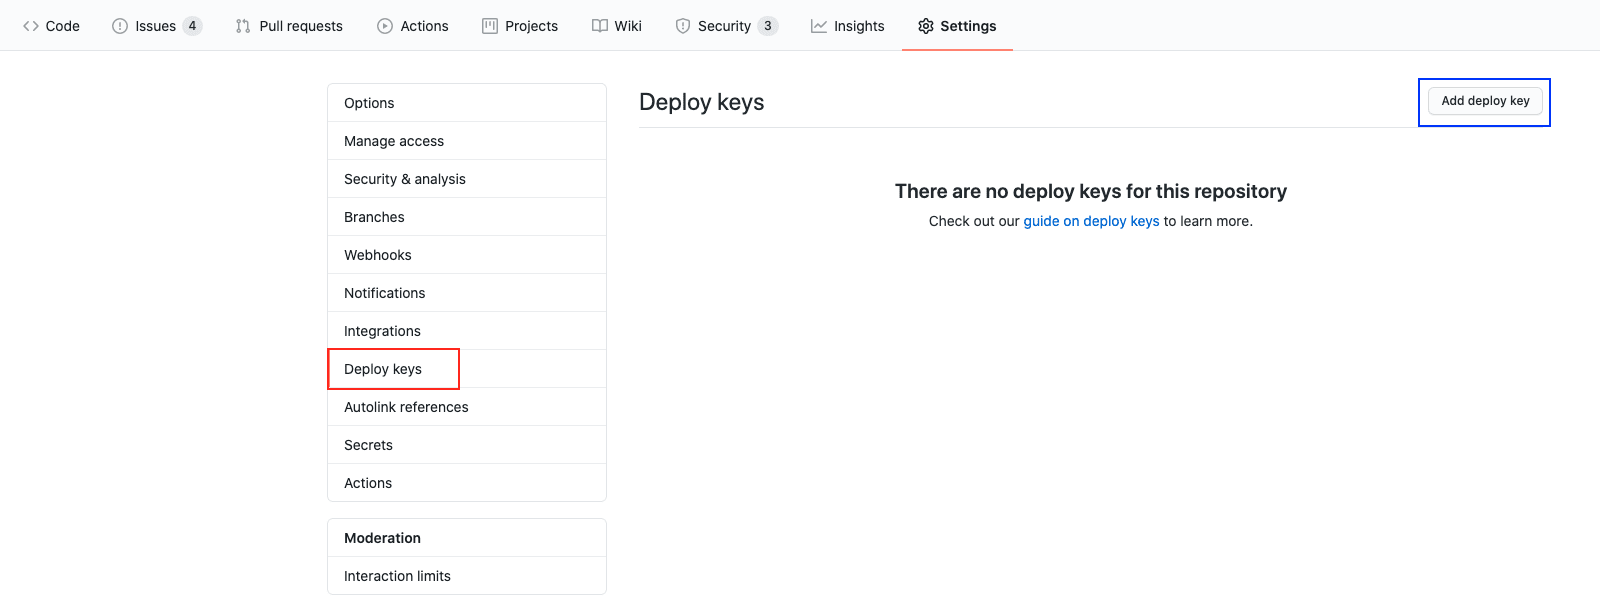
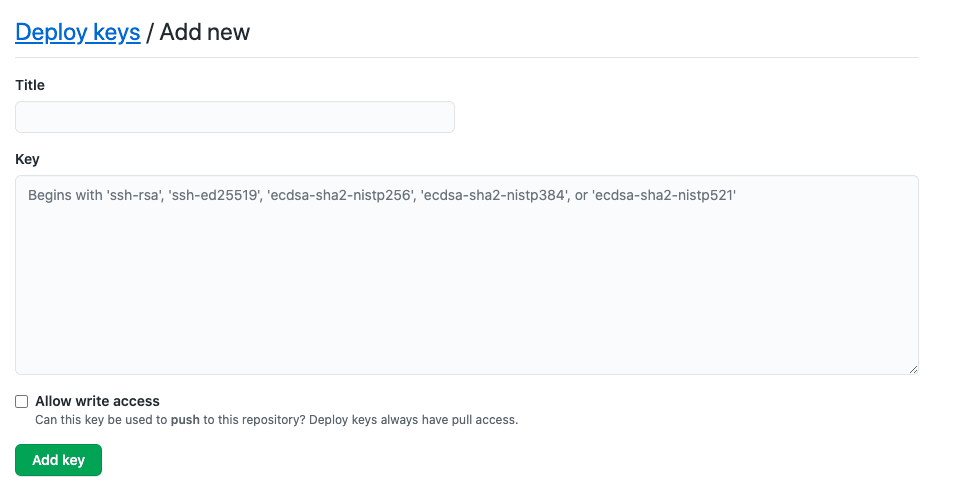
- In your submodule Github repository, navigate to Settings, select Deploy keys option on the sidebar, and click "Add deploy key" to add the generated key.
- Paste the generated key in the
keysection, and assign a relevanttitlefor that key such as "Netlify deploy key" to keep track. Then click onAdd keyto save it.
We can rest assured that Netlify will take care of the auto-deploy for us once commits are merged to master branch of the main repository without error 🎉.
🚨 Warning: The default auto-deployment only applies to the main repository. Suppose you want to enable auto-deployment in case of changes made in the submodule's repository - content-submodule-template. In that case, you will need to set up a workflow with GitHub Actions. We will explore how to achieve this action in the next article.
Deployment with Vercel
At the time of writing, Vercel (or ZEIT Now) hasn’t supported Git submodules in its auto-deployment yet 😭. However, we can overcome this limitation by using the Vercel CLI (or the Now CLI) for manual deployment to production:
vercel --prod

# OR
now --prod
To enable auto-deployment using Vercel, we will need a bit extra workaround, with the help of Github Actions. In our next article, we will explore the workaround.
Resources
- Nuxt-blog-template - template repository for setting Nuxt Content project with submodule
- Content-submodule-template - template repository for content management that can be used as submodule.
Summary
In general, Git submodules can be a bit tricky to use. It requires two-way updates: push the changes from both the submodules and the consumer repository. Pushing the submodules' changes will not be enough for the consumer repository to reflect the new changes, and in our case, to trigger an auto-deployment. And pushing the changes from the consumer repository only will not allow other consumers to use those commits.
Nevertheless, in my opinion, the power of Git submodules is still underrated. It proves to be very useful in code separation and code privacy when being used correctly. And the update limitation can be solved easily with the proper tool - such as GitHub Actions.
Nuxt Content module, with the Git submodule, can genuinely become a Headless CMS, where the content can be stored anywhere, entirely separated from the main source code. With a proper automation workflow setup, we can ensure content editors will only need to learn how to write markdown to work in the content repository, and not learn Git or how to read code.
The next article will create a complete deployment workflow with GitHub Actions for repositories with submodules. It's going to be fun, are you ready? 😉
👉 If you'd like to catch up with me sometimes, follow me on Twitter | Facebook.
Like this post or find it useful? Hit the share button 👇🏼 😉
Learning Vue
Learn the core concepts of Vue.js, the modern JavaScript framework for building frontend applications and interfaces from scratch